aidlc-workflows
专为AI编程Agent设计的自适应软件开发工作流规则集,将项目开发分解为Inception、Construction、Operations三个阶段,通过结构化规则引导AI agent逐步完成。亮点在于与Kiro、Cursor、Claude Code、GitHub Copilot等主流工具深度集成,并提供可扩展的扩展规则体系(安全、测试等),让开发者保持人对关键决策的控制。需注意AI生成内容需人工复核。
README
AI-DLC (AI 驱动的开发生命周期)
🚀 2.0 版本(预览版)公告
我们很高兴地宣布 AI-DLC Workflows 2.0 预览版发布。新版本通过将 AI agent 转变为可验证、可自我修正的工程工作流,使自主软件开发变得切实可行。你可以阅读完整规范(PDF),并查看 v2 分支。我们期待你的反馈,你的意见将直接影响 GA 版本的路径。如有建议,请通过仓库联系我们。
[!IMPORTANT] 生成式 AI 可能会出错。你应该仔细审查所选 AI 模型和 agent 编码助手生成的所有输出及成本。请参阅 AWS 负责任 AI 政策。
AI-DLC 是一个智能软件开发工作流,能适应你的需求、保持质量标准,并让你始终掌控流程。要深入了解 AI-DLC 方法论,请阅读这篇博客以及其中引用的方法论定义文档。
目录
- 通用步骤
- 平台特定设置
- 使用方法
- 三阶段自适应工作流
- 关键特性
- 扩展
- 辅助工具
- 指导原则
- 前提条件
- 故障排除
- 版本控制建议
- 其他资源
- 生成的 aidlc-docs/ 参考
- 实验性:AI 辅助设置(通过发布包下载)
- 贡献指南
- 许可协议
通用步骤
- 从 Releases 页面 下载最新的压缩包,文件名为
ai-dlc-rules-v<版本号>.zip,保存到项目目录之外的文件夹(例如~/Downloads)。 - 解压压缩包。它会包含一个
aidlc-rules/文件夹,里面有两个子目录:aws-aidlc-rules/— 核心 AI-DLC 工作流规则aws-aidlc-rule-details/— 核心规则按条件引用的详细规则
- 根据下文中你使用的编码 agent 和平台进行设置。
平台特定设置
Kiro
AI-DLC 在你的项目工作区中使用 Kiro Steering Files。
以下命令假设你将压缩包解压到了 Downloads 文件夹,因此结果路径为 Downloads/aidlc-rules/。如果你使用了其他位置,请将 Downloads 替换为你的实际文件夹路径。
[!NOTE] Windows 用户: 如果你使用了文件资源管理器的 全部提取... 对话框,默认会创建一个以压缩包命名的包装文件夹(例如
ai-dlc-rules-v0.1.8\aidlc-rules\...)。要么取消勾选/编辑目标位置,使内容直接放在Downloads\aidlc-rules\(与下面命令匹配),要么在每个命令的Downloads\路径前加上ai-dlc-rules-v<版本>\,并将<版本>替换为你下载的版本号。
在 macOS/Linux 上:
mkdir -p .kiro/steering
cp -R ~/Downloads/aidlc-rules/aws-aidlc-rules .kiro/steering/
cp -R ~/Downloads/aidlc-rules/aws-aidlc-rule-details .kiro/
在 Windows (PowerShell) 上:
New-Item -ItemType Directory -Force -Path ".kiro\steering"
Copy-Item -Recurse "$env:USERPROFILE\Downloads\aidlc-rules\aws-aidlc-rules" ".kiro\steering\"
Copy-Item -Recurse "$env:USERPROFILE\Downloads\aidlc-rules\aws-aidlc-rule-details" ".kiro\"
在 Windows (CMD) 上:
mkdir .kiro\steering
xcopy %USERPROFILE%\Downloads\aidlc-rules\aws-aidlc-rules .kiro\steering\aws-aidlc-rules\ /E /I
xcopy %USERPROFILE%\Downloads\aidlc-rules\aws-aidlc-rule-details .kiro\aws-aidlc-rule-details\ /E /I
你的项目结构应如下:
<project-root>/
    ├── .kiro/
    │     ├── steering/
    │     │      ├── aws-aidlc-rules/
    │     ├── aws-aidlc-rule-details/
要验证规则是否已加载:
在 Kiro IDE 中验证
打开 steering files 面板,确认在 Workspace 下能看到 core-workflow 条目,如下截图所示。
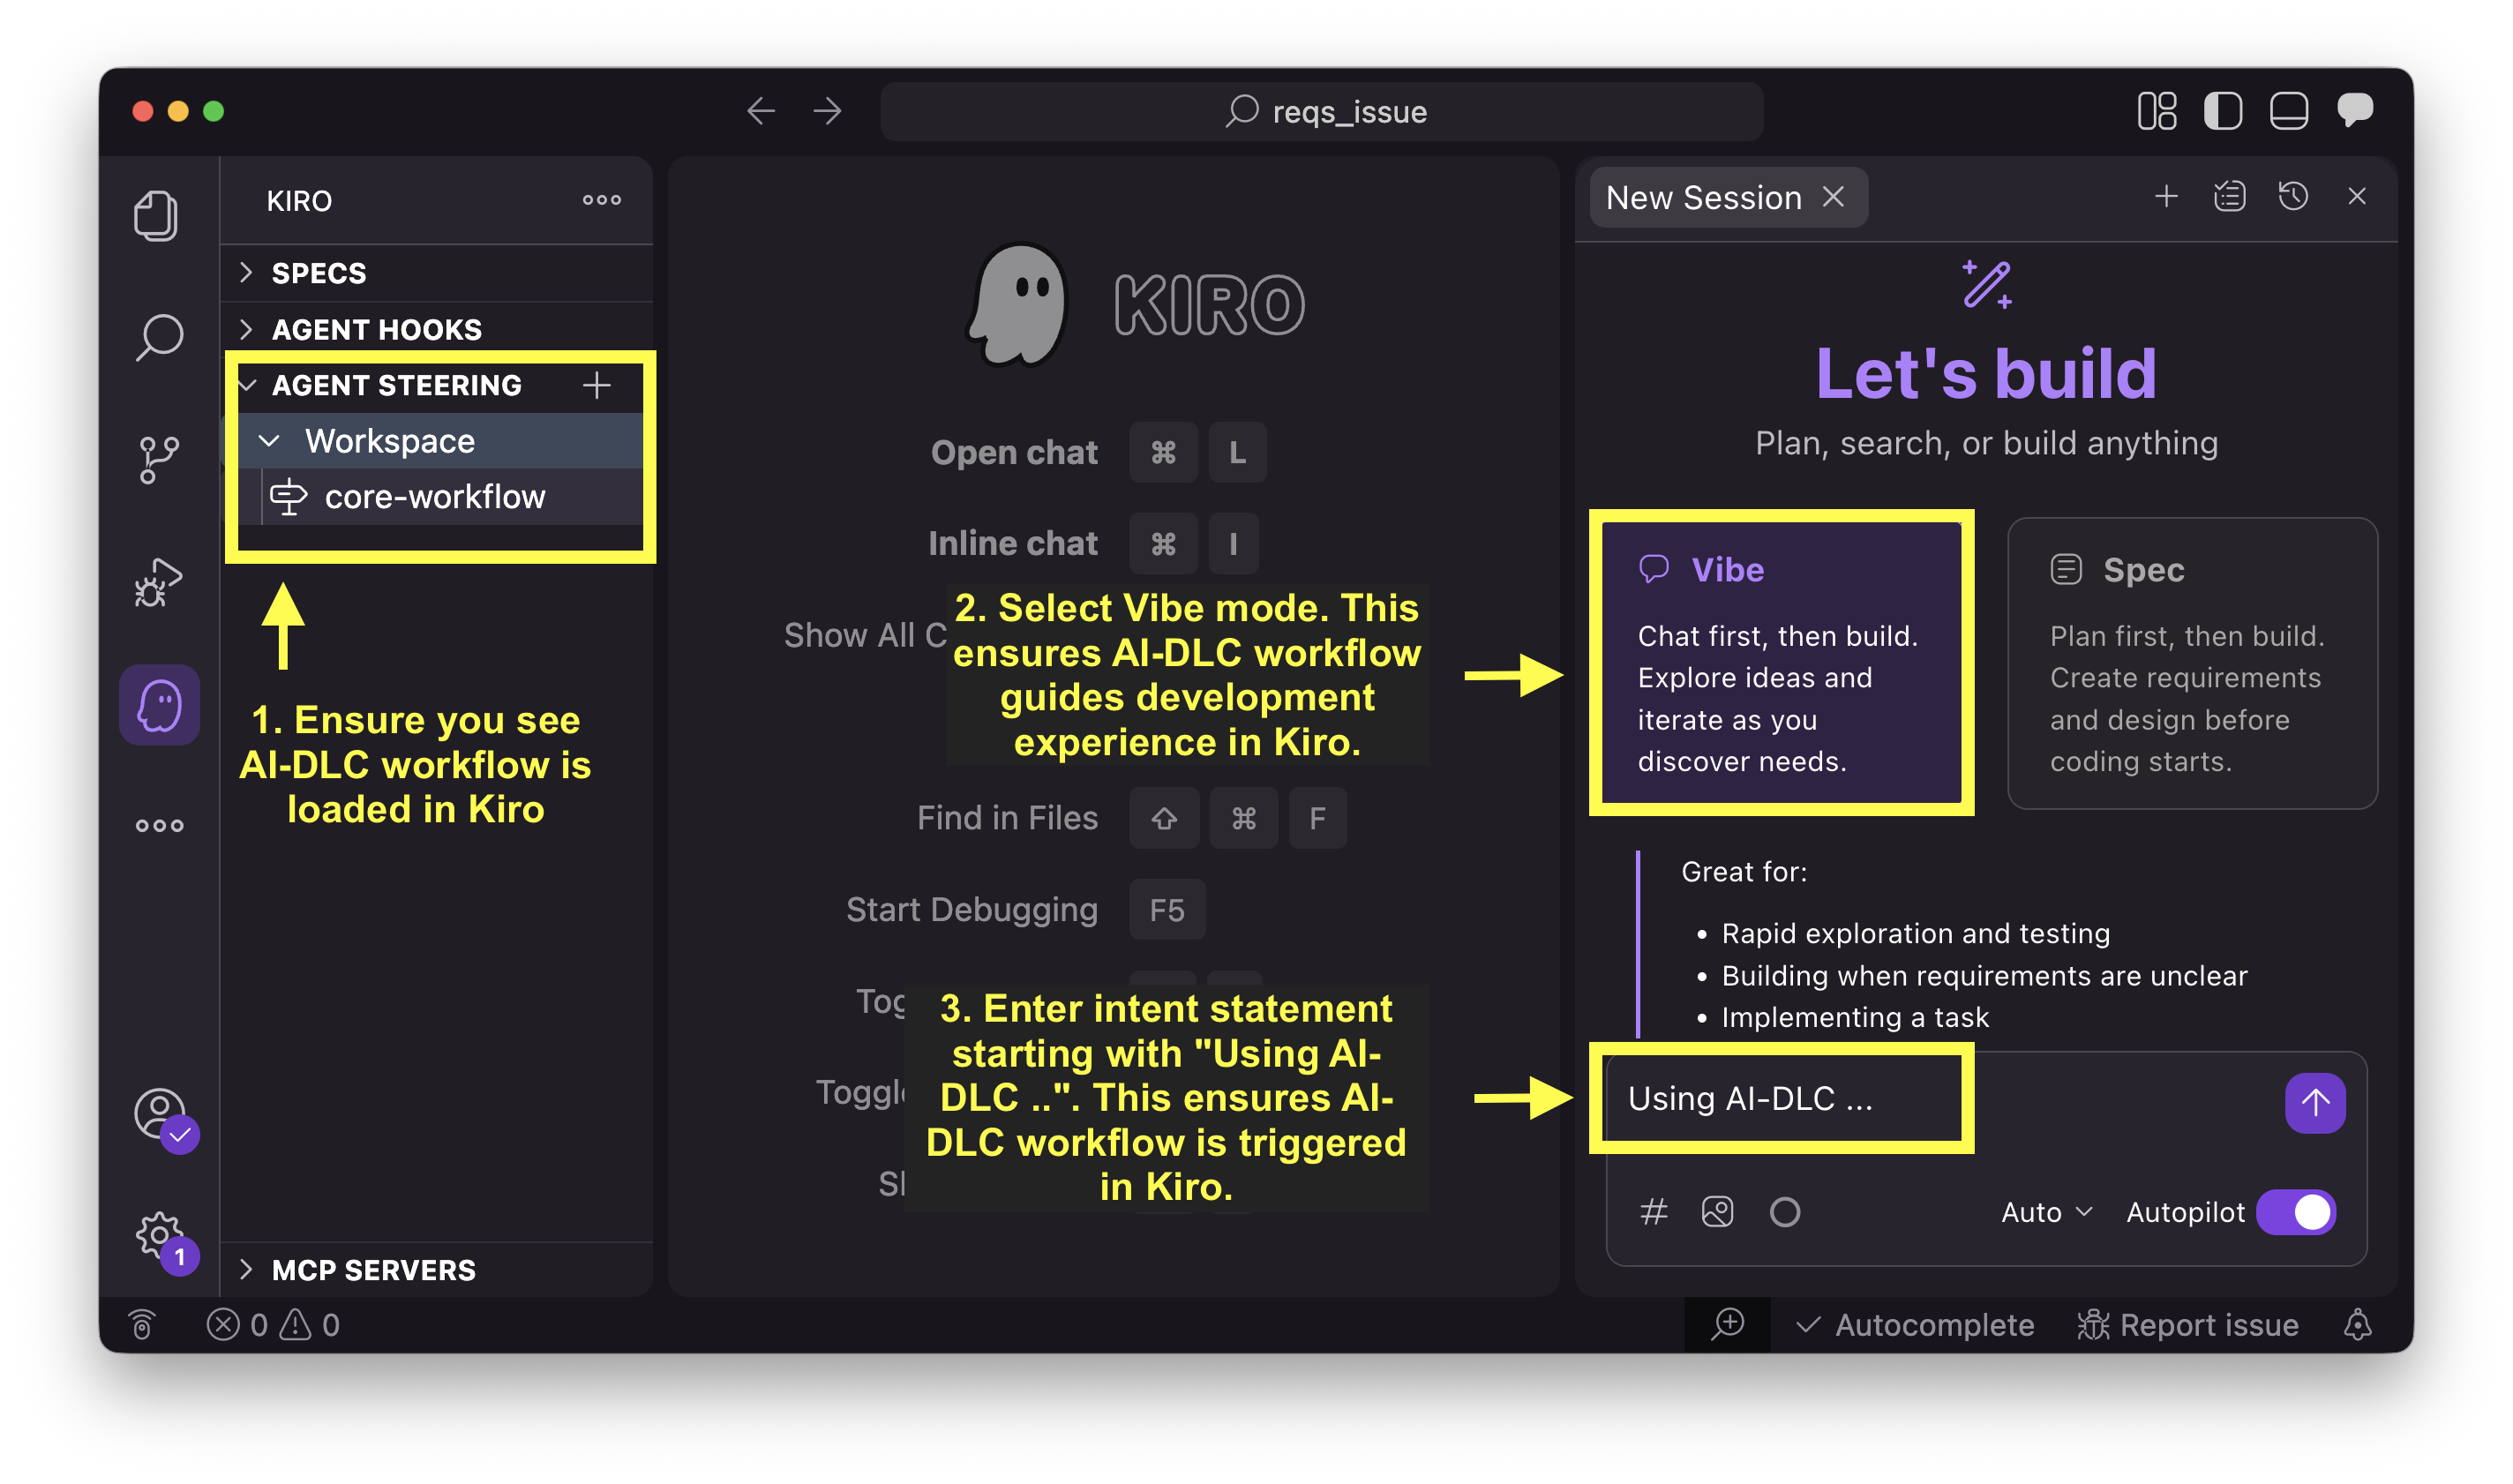
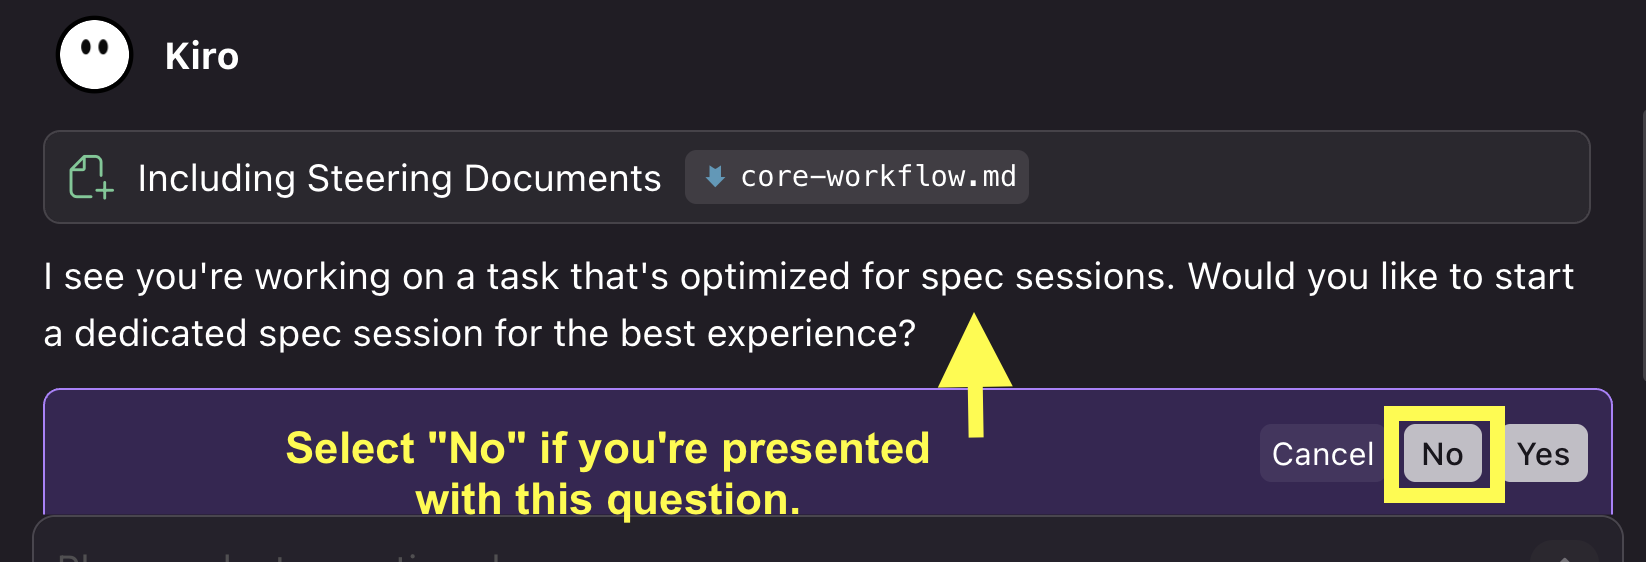
我们使用 Vibe 模式下的 Kiro IDE 来运行 AI-DLC 工作流。这能确保 AI-DLC 工作流在 Kiro 中指导开发流程。Kiro 有时可能会提示你切换到 spec 模式。请选择“否”以保持 Vibe 模式。
在 Kiro CLI 中验证
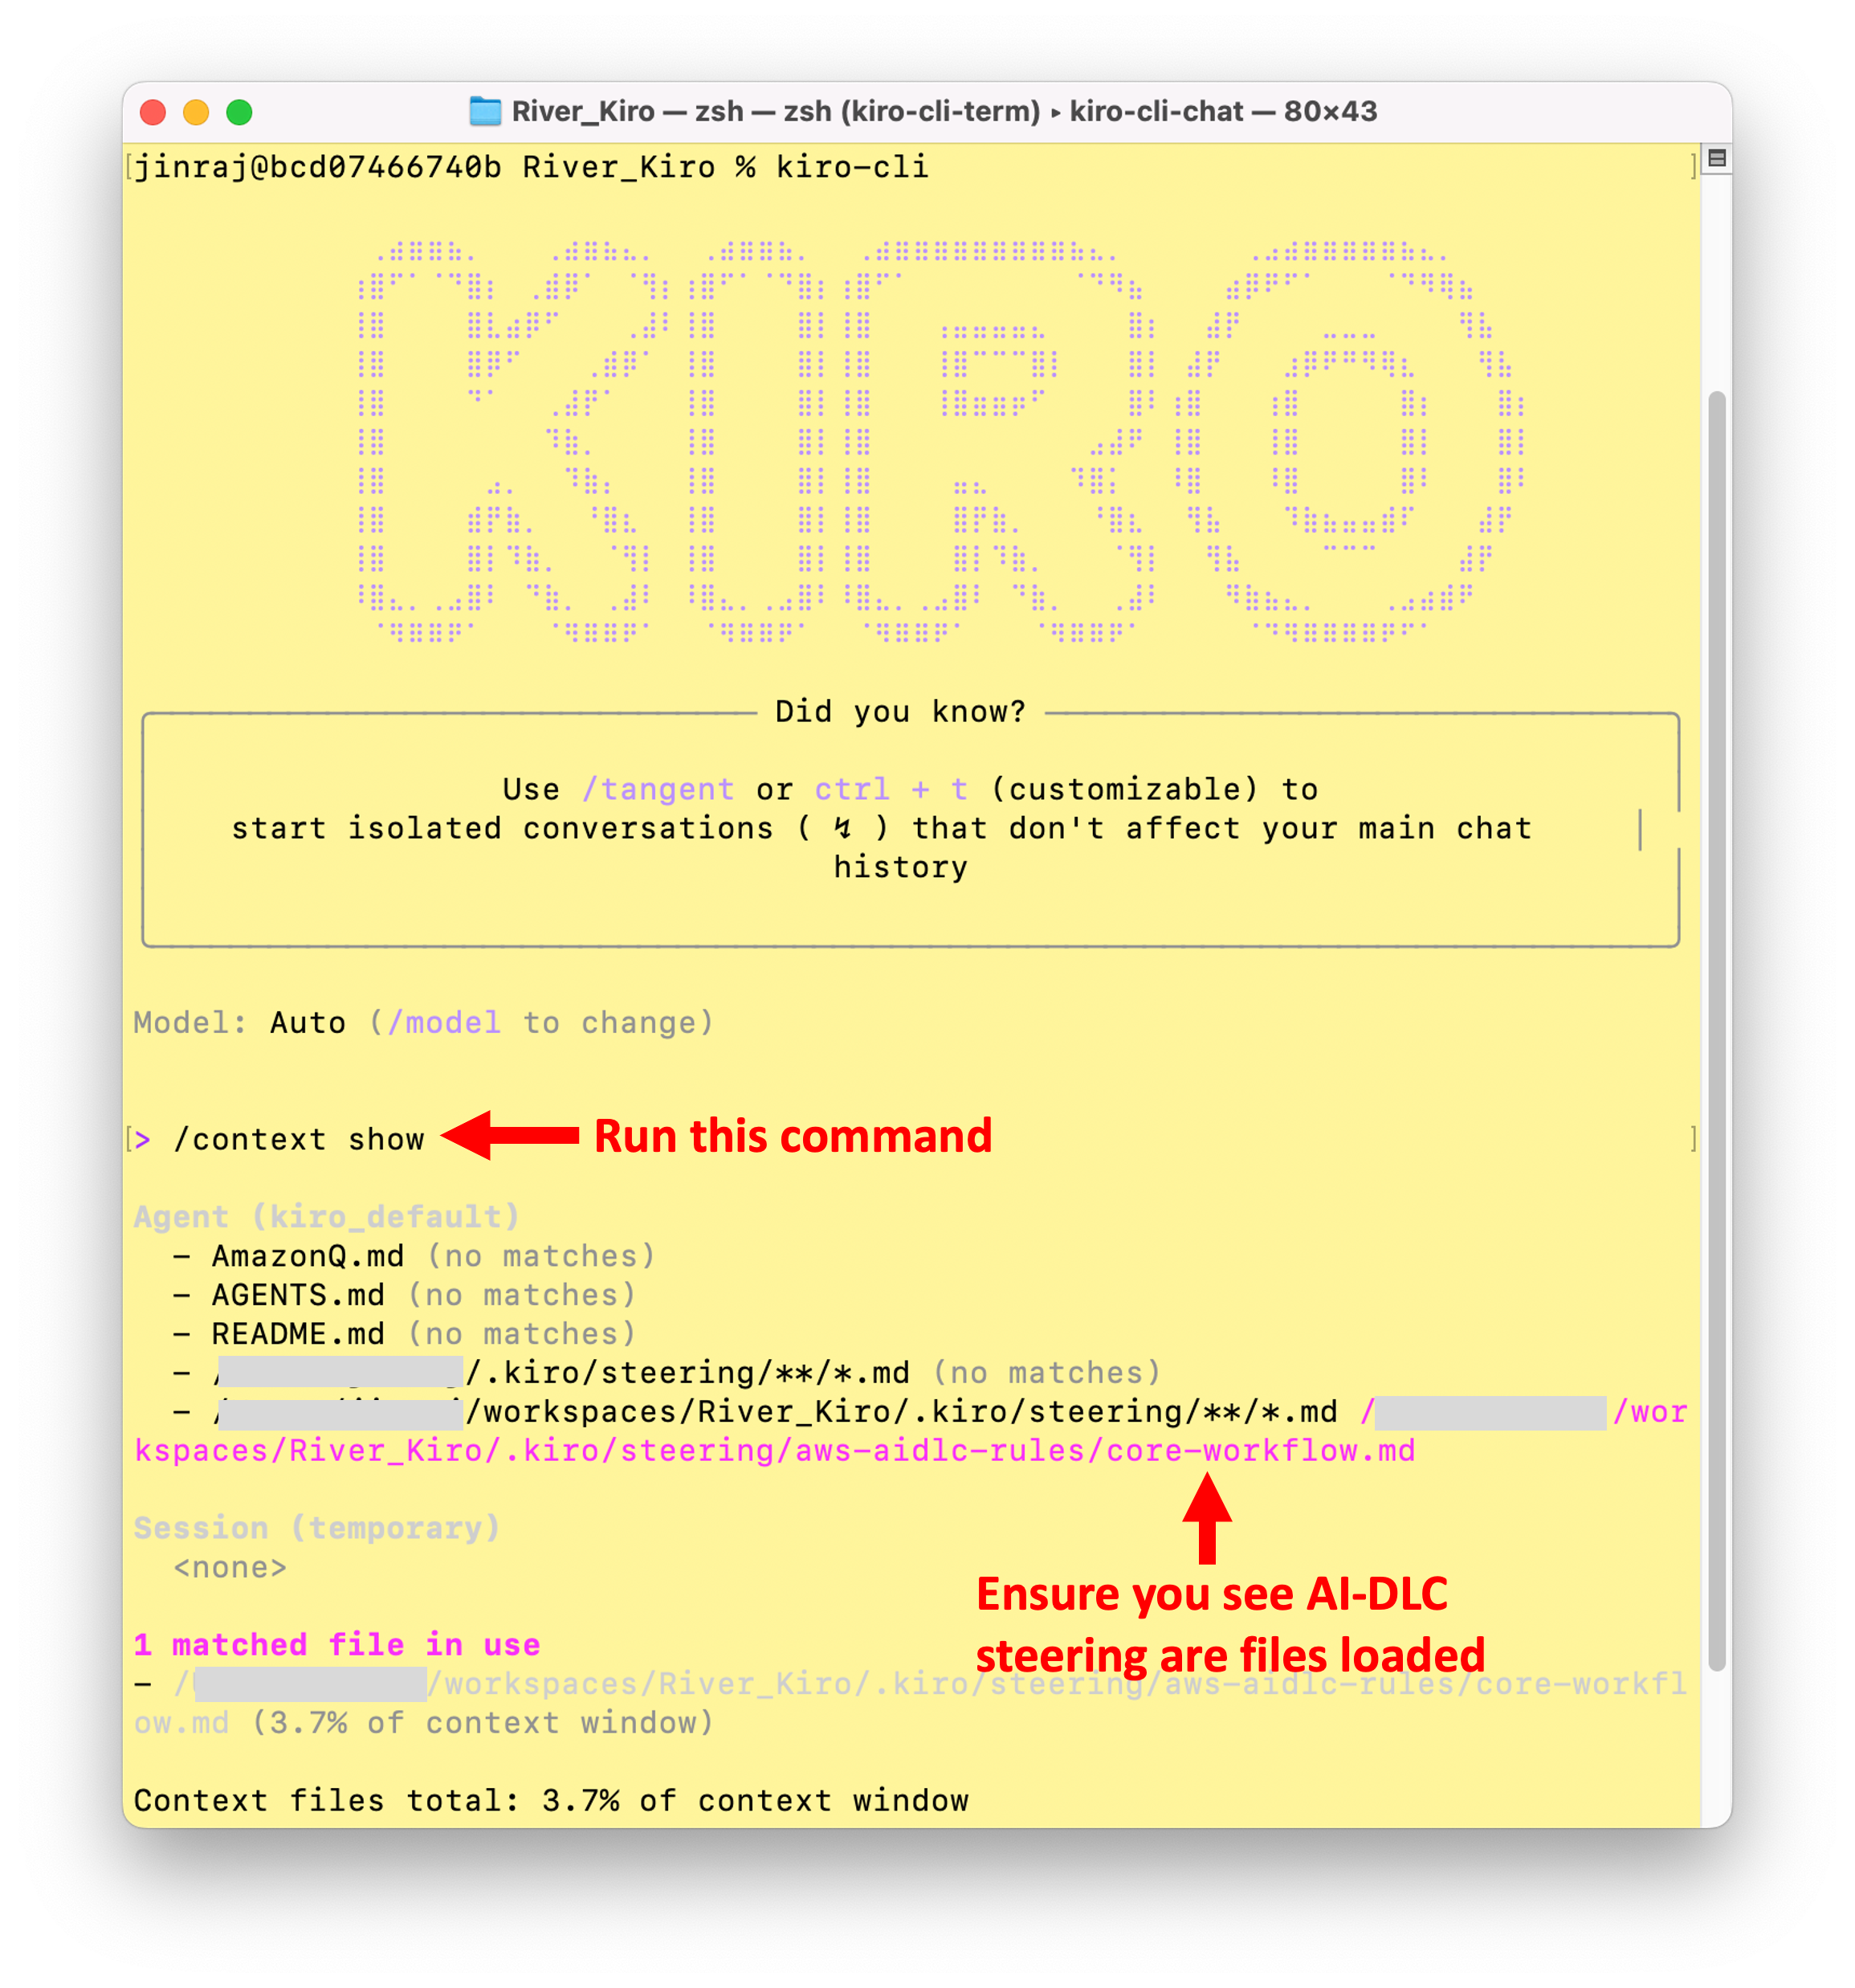
运行 kiro-cli,然后输入 /context show,确认能看到 .kiro/steering/aws-aidlc-rules 条目。
Amazon Q Developer IDE 插件/扩展
AI-DLC 在你的项目工作区中使用 Amazon Q Rules。
以下命令假设你将压缩包解压到了 Downloads 文件夹,因此结果路径为 Downloads/aidlc-rules/。如果你使用了其他位置,请将 Downloads 替换为你的实际文件夹路径。
[!NOTE] Windows 用户: 如果你使用了文件资源管理器的 全部提取... 对话框,默认会创建一个以压缩包命名的包装文件夹(例如
ai-dlc-rules-v0.1.8\aidlc-rules\...)。要么取消勾选/编辑目标位置,使内容直接放在Downloads\aidlc-rules\(与下面命令匹配),要么在每个命令的Downloads\路径前加上ai-dlc-rules-v<版本>\,并将<版本>替换为你下载的版本号。
在 macOS/Linux 上:
mkdir -p .amazonq/rules
cp -R ~/Downloads/aidlc-rules/aws-aidlc-rules .amazonq/rules/
cp -R ~/Downloads/aidlc-rules/aws-aidlc-rule-details .amazonq/
在 Windows (PowerShell) 上:
New-Item -ItemType Directory -Force -Path ".amazonq\rules"
Copy-Item -Recurse "$env:USERPROFILE\Downloads\aidlc-rules\aws-aidlc-rules" ".amazonq\rules\"
Copy-Item -Recurse "$env:USERPROFILE\Downloads\aidlc-rules\aws-aidlc-rule-details" ".amazonq\"
在 Windows (CMD) 上:
mkdir .amazonq\rules
xcopy %USERPROFILE%\Downloads\aidlc-rules\aws-aidlc-rules .amazonq\rules\aws-aidlc-rules\ /E /I
xcopy %USERPROFILE%\Downloads\aidlc-rules\aws-aidlc-rule-details .amazonq\aws-aidlc-rule-details\ /E /I
你的项目结构应如下:
<project-root>/
    ├── .amazonq/
    │     ├── rules/
    │     │     ├── aws-aidlc-rules/
    │     ├── aws-aidlc-rule-details/
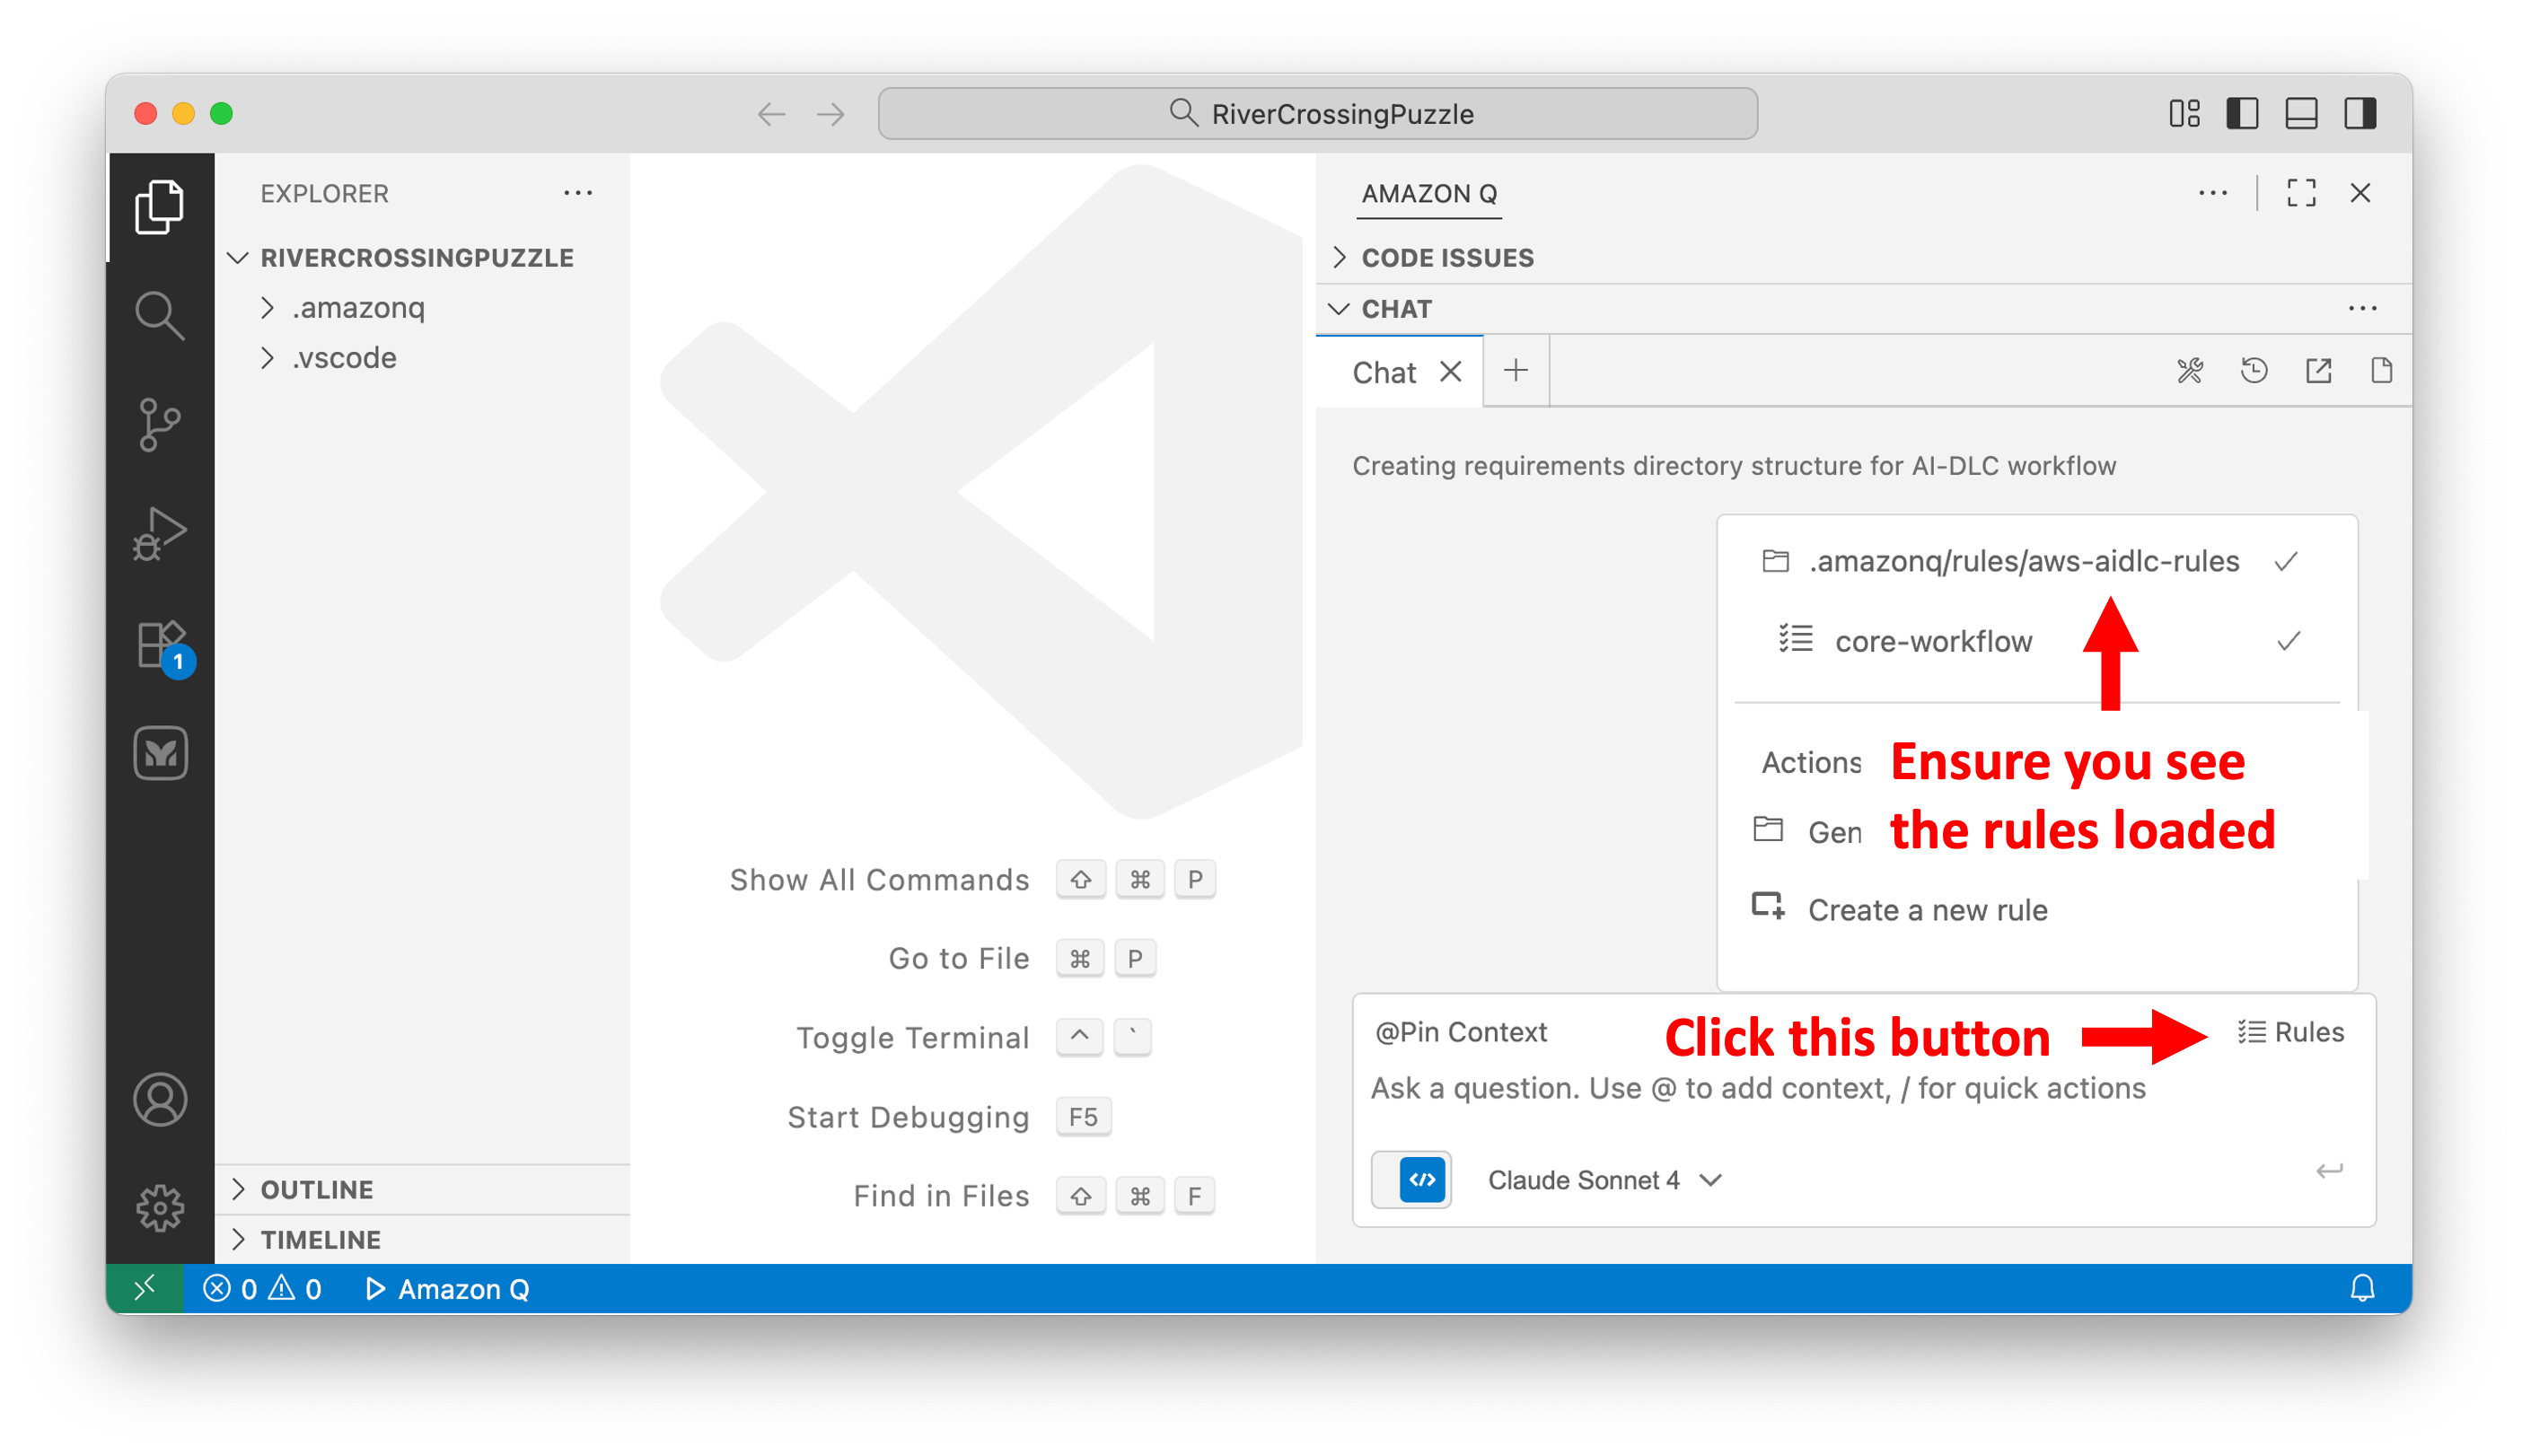
要验证规则是否已加载:
- 在 Amazon Q 聊天窗口中,点击右下角的
Rules按钮。 - 确认能看到
.amazonq/rules/aws-aidlc-rules条目。
Cursor IDE
AI-DLC 使用 Cursor Rules 来实现其智能工作流。
以下命令假设你将压缩包解压到了 Downloads 文件夹,因此结果路径为 Downloads/aidlc-rules/。如果你使用了其他位置,请将 Downloads 替换为你的实际文件夹路径。
[!NOTE] Windows 用户: 如果你使用了文件资源管理器的 全部提取... 对话框,默认会创建一个以压缩包命名的包装文件夹(例如
ai-dlc-rules-v0.1.8\aidlc-rules\...)。要么取消勾选/编辑目标位置,使内容直接放在Downloads\aidlc-rules\(与下面命令匹配),要么在每个命令的Downloads\路径前加上ai-dlc-rules-v<版本>\,并将<版本>替换为你下载的版本号。
选项 1:项目规则(推荐)
Unix/Linux/macOS:
mkdir -p .cursor/rules

cat > .cursor/rules/ai-dlc-workflow.mdc << 'EOF'
---
description: "AI-DLC (AI-Driven Development Life Cycle) adaptive workflow for software development"
alwaysApply: true
---

EOF
cat ~/Downloads/aidlc-rules/aws-aidlc-rules/core-workflow.md >> .cursor/rules/ai-dlc-workflow.mdc

mkdir -p .aidlc-rule-details
cp -R ~/Downloads/aidlc-rules/aws-aidlc-rule-details/* .aidlc-rule-details/
Windows PowerShell:
New-Item -ItemType Directory -Force -Path ".cursor\rules"

$frontmatter = @"
---
description: "AI-DLC (AI-Driven Development Life Cycle) adaptive workflow for software development"
alwaysApply: true
---

"@
$frontmatter | Out-File -FilePath ".cursor\rules\ai-dlc-workflow.mdc" -Encoding utf8

Get-Content "$env:USERPROFILE\Downloads\aidlc-rules\aws-aidlc-rules\core-workflow.md" | Add-Content ".cursor\rules\ai-dlc-workflow.mdc"

New-Item -ItemType Directory -Force -Path ".aidlc-rule-details"
Copy-Item "$env:USERPROFILE\Downloads\aidlc-rules\aws-aidlc-rule-details\*" ".aidlc-rule-details\" -Recurse
Windows CMD:
mkdir .cursor\rules

(
echo ---
echo description: "AI-DLC (AI-Driven Development Life Cycle) adaptive workflow for software development"
echo alwaysApply: true
echo ---
echo.
) > .cursor\rules\ai-dlc-workflow.mdc

type "%USERPROFILE%\Downloads\aidlc-rules\aws-aidlc-rules\core-workflow.md" >> .cursor\rules\ai-dlc-workflow.mdc

mkdir .aidlc-rule-details
xcopy "%USERPROFILE%\Downloads\aidlc-rules\aws-aidlc-rule-details" ".aidlc-rule-details\" /E /I
选项 2:AGENTS.md(简单替代方案)
Unix/Linux/macOS:
cp ~/Downloads/aidlc-rules/aws-aidlc-rules/core-workflow.md ./AGENTS.md
mkdir -p .aidlc-rule-details
cp -R ~/Downloads/aidlc-rules/aws-aidlc-rule-details/* .aidlc-rule-details/
Windows PowerShell:
Copy-Item "$env:USERPROFILE\Downloads\aidlc-rules\aws-aidlc-rules\core-workflow.md" ".\AGENTS.md"
New-Item -ItemType Directory -Force -Path ".aidlc-rule-details"
Copy-Item "$env:USERPROFILE\Downloads\aidlc-rules\aws-aidlc-rule-details\*" ".aidlc-rule-details\" -Recurse
Windows CMD:
copy "%USERPROFILE%\Downloads\aidlc-rules\aws-aidlc-rules\core-workflow.md" ".\AGENTS.md"
mkdir .aidlc-rule-details
xcopy "%USERPROFILE%\Downloads\aidlc-rules\aws-aidlc-rule-details" ".aidlc-rule-details\" /E /I
验证设置:
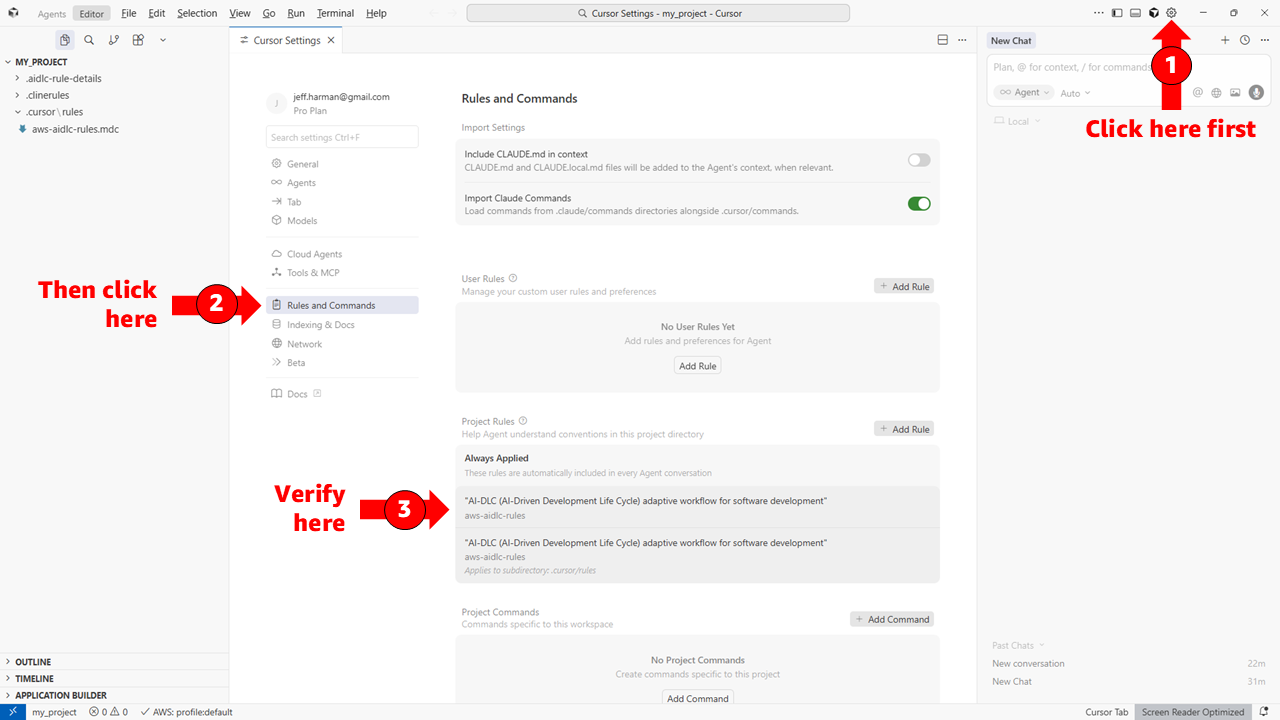
- 打开 Cursor Settings → Rules, Commands
- 在 Project Rules 下应能看到
ai-dlc-workflow - 对于
AGENTS.md,它会自动被检测并应用
目录结构(选项 1):
<my-project>/
├── .cursor/
│   └── rules/
│       └── ai-dlc-workflow.mdc
└── .aidlc-rule-details/
    ├── common/
    ├── inception/
    ├── construction/
    ├── extensions/
    └── operations/
Cline
AI-DLC 使用 Cline Rules 来实现其智能工作流。
以下命令假设你将压缩包解压到了 Downloads 文件夹,因此结果路径为 Downloads/aidlc-rules/。如果你使用了其他位置,请将 Downloads 替换为你的实际文件夹路径。
[!NOTE] Windows 用户: 如果你使用了文件资源管理器的 全部提取... 对话框,默认会创建一个以压缩包命名的包装文件夹(例如
ai-dlc-rules-v0.1.8\aidlc-rules\...)。要么取消勾选/编辑目标位置,使内容直接放在Downloads\aidlc-rules\(与下面命令匹配),要么在每个命令的Downloads\路径前加上ai-dlc-rules-v<版本>\,并将<版本>替换为你下载的版本号。
选项 1:.clinerules 目录(推荐)
Unix/Linux/macOS:
mkdir -p .clinerules
cp ~/Downloads/aidlc-rules/aws-aidlc-rules/core-workflow.md .clinerules/
mkdir -p .aidlc-rule-details
cp -R ~/Downloads/aidlc-rules/aws-aidlc-rule-details/* .aidlc-rule-details/
Windows PowerShell:
New-Item -ItemType Directory -Force -Path ".clinerules"
Copy-Item "$env:USERPROFILE\Downloads\aidlc-rules\aws-aidlc-rules\core-workflow.md" ".clinerules\"
New-Item -ItemType Directory -Force -Path ".aidlc-rule-details"
Copy-Item "$env:USERPROFILE\Downloads\aidlc-rules\aws-aidlc-rule-details\*" ".aidlc-rule-details\" -Recurse
Windows CMD:
mkdir .clinerules
copy "%USERPROFILE%\Downloads\aidlc-rules\aws-aidlc-rules\core-workflow.md" ".clinerules\"
mkdir .aidlc-rule-details
xcopy "%USERPROFILE%\Downloads\aidlc-rules\aws-aidlc-rule-details" ".aidlc-rule-details\" /E /I
选项 2:AGENTS.md(替代方案)
Unix/Linux/macOS:
cp ~/Downloads/aidlc-rules/aws-aidlc-rules/core-workflow.md ./AGENTS.md
mkdir -p .aidlc-rule-details
cp -R ~/Downloads/aidlc-rules/aws-aidlc-rule-details/* .aidlc-rule-details/
Windows PowerShell:
Copy-Item "$env:USERPROFILE\Downloads\aidlc-rules\aws-aidlc-rules\core-workflow.md" ".\AGENTS.md"
New-Item -ItemType Directory -Force -Path ".aidlc-rule-details"
Copy-Item "$env:USERPROFILE\Downloads\aidlc-rules\aws-aidlc-rule-details\*" ".aidlc-rule-details\" -Recurse
Windows CMD:
copy "%USERPROFILE%\Downloads\aidlc-rules\aws-aidlc-rules\core-workflow.md" ".\AGENTS.md"
mkdir .aidlc-rule-details
xcopy "%USERPROFILE%\Downloads\aidlc-rules\aws-aidlc-rule-details" ".aidlc-rule-details\" /E /I
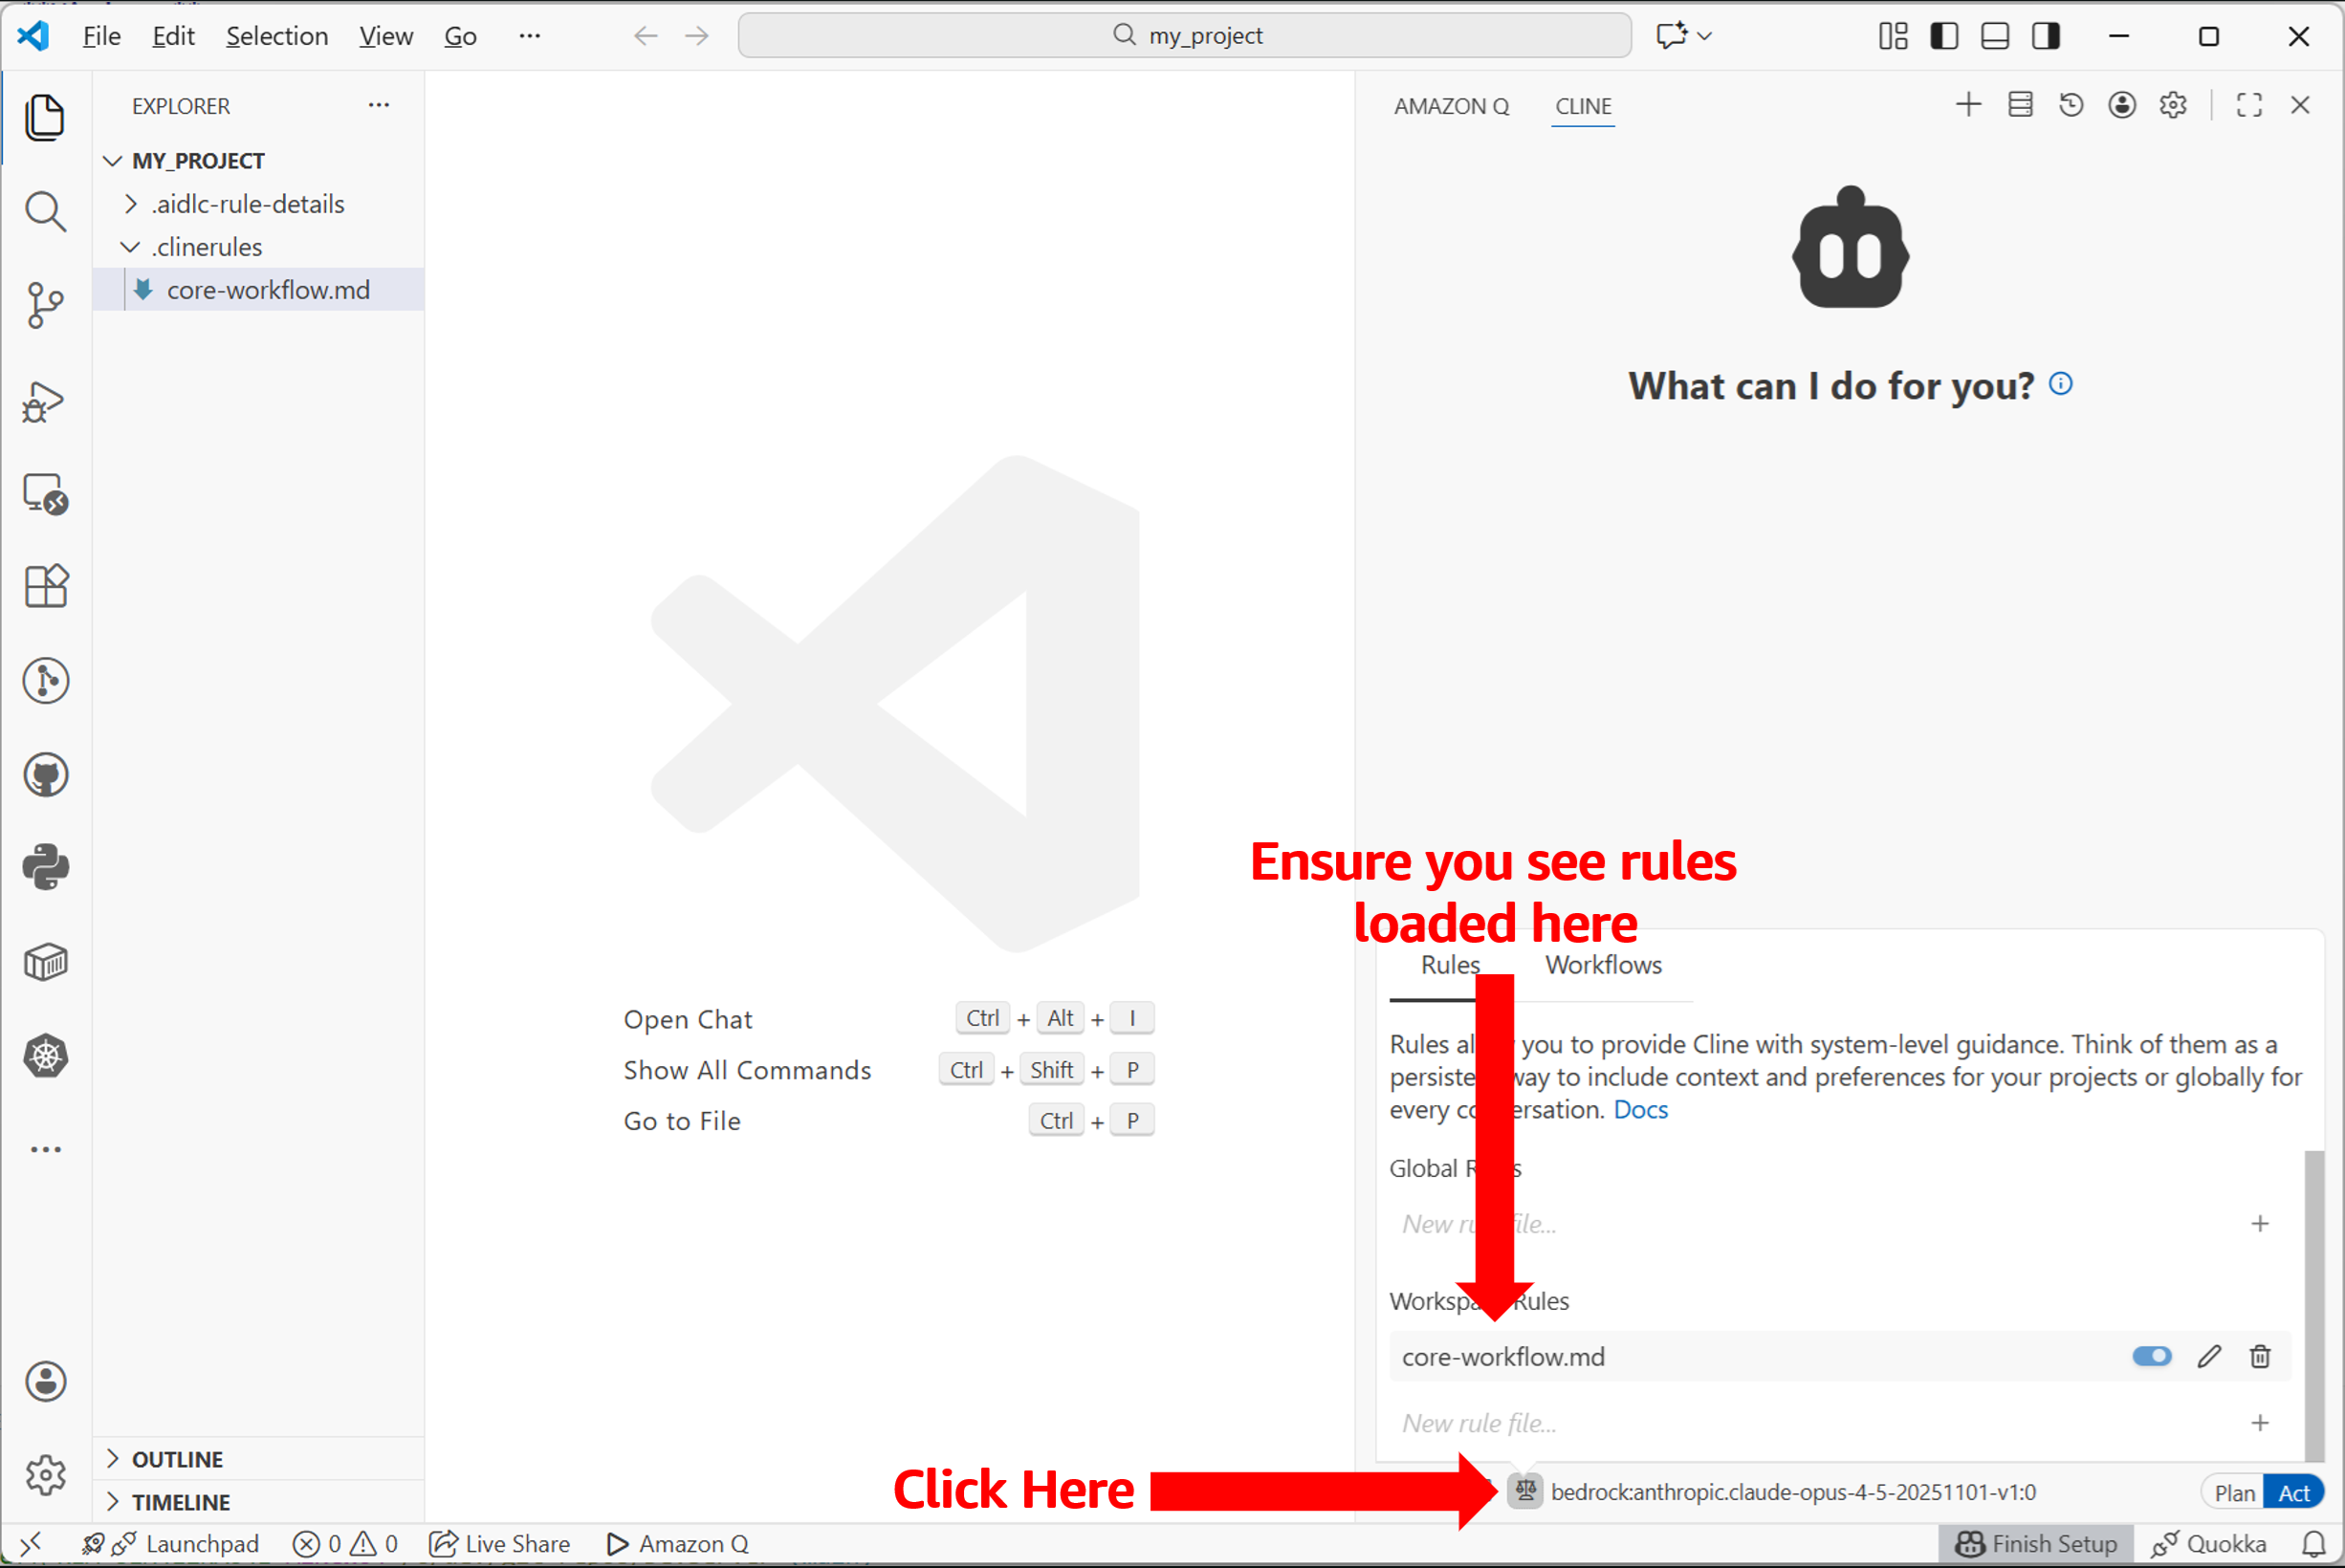
验证设置:
- 在 Cline 的聊天界面中,查看聊天输入框下方的 Rules 弹窗
- 验证
core-workflow.md已列出且处于激活状态 - 你可以根据需要开关该规则文件
目录结构(选项 1):
<my-project>/
├── .clinerules/
│   └── core-workflow.md
└── .aidlc-rule-details/
    ├── common/
    ├── inception/
    ├── construction/
    ├── extensions/
    └── operations/
Claude Code
AI-DLC 使用 Claude Code 的项目记忆文件(CLAUDE.md)来实现其智能工作流。
以下命令假设你将压缩包解压到了 Downloads 文件夹,因此结果路径为 Downloads/aidlc-rules/。如果你使用了其他位置,请将 Downloads 替换为你的实际文件夹路径。
[!NOTE] Windows 用户: 如果你使用了文件资源管理器的 全部提取... 对话框,默认会创建一个以压缩包命名的包装文件夹(例如
ai-dlc-rules-v0.1.8\aidlc-rules\...)。要么取消勾选/编辑目标位置,使内容直接放在Downloads\aidlc-rules\(与下面命令匹配),要么在每个命令的Downloads\路径前加上ai-dlc-rules-v<版本>\,并将<版本>替换为你下载的版本号。
选项 1:项目根目录(推荐)
Unix/Linux/macOS:
cp ~/Downloads/aidlc-rules/aws-aidlc-rules/core-workflow.md ./CLAUDE.md
mkdir -p .aidlc-rule-details
cp -R ~/Downloads/aidlc-rules/aws-aidlc-rule-details/* .aidlc-rule-details/
Windows PowerShell:
Copy-Item "$env:USERPROFILE\Downloads\aidlc-rules\aws-aidlc-rules\core-workflow.md" ".\CLAUDE.md"
New-Item -ItemType Directory -Force -Path ".aidlc-rule-details"
Copy-Item "$env:USERPROFILE\Downloads\aidlc-rules\aws-aidlc-rule-details\*" ".aidlc-rule-details\" -Recurse
Windows CMD:
copy "%USERPROFILE%\Downloads\aidlc-rules\aws-aidlc-rules\core-workflow.md" ".\CLAUDE.md"
mkdir .aidlc-rule-details
xcopy "%USERPROFILE%\Downloads\aidlc-rules\aws-aidlc-rule-details" ".aidlc-rule-details\" /E /I
选项 2:.claude 目录
Unix/Linux/macOS:
mkdir -p .claude
cp ~/Downloads/aidlc-rules/aws-aidlc-rules/core-workflow.md .claude/CLAUDE.md
mkdir -p .aidlc-rule-details
cp -R ~/Downloads/aidlc-rules/aws-aidlc-rule-details/* .aidlc-rule-details/
Windows PowerShell:
New-Item -ItemType Directory -Force -Path ".claude"
Copy-Item "$env:USERPROFILE\Downloads\aidlc-rules\aws-aidlc-rules\core-workflow.md" ".claude\CLAUDE.md"
New-Item -ItemType Directory -Force -Path ".aidlc-rule-details"
Copy-Item "$env:USERPROFILE\Downloads\aidlc-rules\aws-aidlc-rule-details\*" ".aidlc-rule-details\" -Recurse
Windows CMD:
mkdir .claude
copy "%USERPROFILE%\Downloads\aidlc-rules\aws-aidlc-rules\core-workflow.md" ".claude\CLAUDE.md"
mkdir .aidlc-rule-details
xcopy "%USERPROFILE%\Downloads\aidlc-rules\aws-aidlc-rule-details" ".aidlc-rule-details\" /E /I
验证设置:
- 在项目目录中启动 Claude Code(CLI:
claude或 VS Code 扩展) - 使用
/config命令查看当前配置 - 询问 Claude:“当前项目中激活了哪些指令?”
目录结构(选项 1):
<my-project>/
├── CLAUDE.md
└── .aidlc-rule-details/
    ├── common/
    ├── inception/
    ├── construction/
    ├── extensions/
    └── operations/
GitHub Copilot
AI-DLC 使用 GitHub Copilot 自定义指令来实现其智能工作流。.github/copilot-instructions.md 文件会被自动检测并应用到工作区中的所有聊天请求。
以下命令假设你将压缩包解压到了 Downloads 文件夹,因此结果路径为 Downloads/aidlc-rules/。如果你使用了其他位置,请将 Downloads 替换为你的实际文件夹路径。
[!NOTE] Windows 用户: 如果你使用了文件资源管理器的 全部提取... 对话框,默认会创建一个以压缩包命名的包装文件夹(例如
ai-dlc-rules-v0.1.8\aidlc-rules\...)。要么取消勾选/编辑目标位置,使内容直接放在Downloads\aidlc-rules\(与下面命令匹配),要么在每个命令的Downloads\路径前加上ai-dlc-rules-v<版本>\,并将<版本>替换为你下载的版本号。
Unix/Linux/macOS:
mkdir -p .github
cp ~/Downloads/aidlc-rules/aws-aidlc-rules/core-workflow.md .github/copilot-instructions.md
mkdir -p .aidlc-rule-details
cp -R ~/Downloads/aidlc-rules/aws-aidlc-rule-details/* .aidlc-rule-details/
Windows PowerShell:
New-Item -ItemType Directory -Force -Path ".github"
Copy-Item "$env:USERPROFILE\Downloads\aidlc-rules\aws-aidlc-rules\core-workflow.md" ".github\copilot-instructions.md"
New-Item -ItemType Directory -Force -Path ".aidlc-rule-details"
Copy-Item "$env:USERPROFILE\Downloads\aidlc-rules\aws-aidlc-rule-details\*" ".aidlc-rule-details\" -Recurse
Windows CMD:
mkdir .github
copy "%USERPROFILE%\Downloads\aidlc-rules\aws-aidlc-rules\core-workflow.md" ".github\copilot-instructions.md"
mkdir .aidlc-rule-details
xcopy "%USERPROFILE%\Downloads\aidlc-rules\aws-aidlc-rule-details" ".aidlc-rule-details\" /E /I
验证设置:
- 使用项目文件夹打开 VS Code
- 打开 Copilot 聊天面板(Cmd/Ctrl+Shift+I)
- 选择 Configure Chat(齿轮图标)> Chat Instructions,确认
copilot-instructions已列出 - 或者,在聊天输入框中输入
/instructions查看激活的指令
目录结构:
<my-project>/
├── .github/
│   └── copilot-instructions.md
└── .aidlc-rule-details/
    ├── common/
    ├── inception/
    ├── construction/
    ├── extensions/
    └── operations/
OpenAI Codex
AI-DLC 支持 OpenAI Codex 作为编码 agent,使用 Codex AGENTS.md 规范来交付其智能工作流。Codex 会在启动会话时自动发现并加载项目根目录下的 AGENTS.md。
以下命令假设你将压缩包解压到了 Downloads 文件夹,因此结果路径为 Downloads/aidlc-rules/。如果你使用了其他位置,请将 Downloads 替换为你的实际文件夹路径。
[!NOTE] Windows 用户: 如果你使用了文件资源管理器的 全部提取... 对话框,默认会创建一个以压缩包命名的包装文件夹(例如
ai-dlc-rules-v0.1.8\aidlc-rules\...)。要么取消勾选/编辑目标位置,使内容直接放在Downloads\aidlc-rules\(与下面命令匹配),要么在每个命令的Downloads\路径前加上ai-dlc-rules-v<版本>\,并将<版本>替换为你下载的版本号。
Unix/Linux/macOS:
cp ~/Downloads/aidlc-rules/aws-aidlc-rules/core-workflow.md ./AGENTS.md
mkdir -p .aidlc-rule-details
cp -R ~/Downloads/aidlc-rules/aws-aidlc-rule-details/* .aidlc-rule-details/
Windows PowerShell:
Copy-Item "$env:USERPROFILE\Downloads\aidlc-rules\aws-aidlc-rules\core-workflow.md" ".\AGENTS.md"
New-Item -ItemType Directory -Force -Path ".aidlc-rule-details"
Copy-Item "$env:USERPROFILE\Downloads\aidlc-rules\aws-aidlc-rule-details\*" ".aidlc-rule-details\" -Recurse
Windows CMD:
copy "%USERPROFILE%\Downloads\aidlc-rules\aws-aidlc-rules\core-workflow.md" ".\AGENTS.md"
mkdir .aidlc-rule-details
xcopy "%USERPROFILE%\Downloads\aidlc-rules\aws-aidlc-rule-details" ".aidlc-rule-details\" /E /I
验证设置:
- 在项目目录中启动 Codex 会话
- 询问 Codex:对于现有项目 — “Using AIDLC analyze the project?” 或对于新项目 “Using Aidlc what workflow do you see” 。
- Codex 应描述 AI-DLC 的三阶段工作流(Inception → Construction → Operations)
[!NOTE]
AGENTS.md文件设计为在默认设置下适合 Codex 的指令预算。如果你添加了大量项目特定内容,并且 Codex 报告项目文档超出其指令限制,你可以在 Codex 配置中增加限制(例如,调整config.toml文件中的project_doc_max_bytes):project_doc_max_bytes = 65536 # 示例值;根据项目选择合适的限制
目录结构:
<my-project>/
├── AGENTS.md
└── .aidlc-rule-details/
    ├── common/
    ├── inception/
    ├── construction/
    ├── extensions/
    └── operations/
其他 Agent
AI-DLC 可与任何支持项目级规则或 steering files 的编码 agent 配合使用。通用方法:
- 将
aws-aidlc-rules/放置到你的 agent 读取项目规则的位置(请查阅 agent 的文档)。 - 将
aws-aidlc-rule-details/放置在兄弟目录下,以便规则能够引用它。
如果你的 agent 没有规则文件的约定,则将两个文件夹都放在项目根目录,并将 agent 指向 aws-aidlc-rules/ 作为其规则目录。
使用方法
- 在聊天中以 “Using AI-DLC, ...” 开头,陈述你的意图,开始任何软件开发项目。
- AI-DLC 工作流会自动激活并开始引导你。
- 回答 AI-DLC 提出的结构化问题。
- 仔细审查 AI 生成的每个计划。提供你的监督和验证。
- 查看执行计划,了解哪些阶段会运行。
- 仔细审查产物并批准每个阶段,以保持控制。
- 所有产物将生成在
aidlc-docs/目录中。
三阶段自适应工作流
AI-DLC 遵循结构化的三阶段方法,根据项目的复杂度自适应:
🔵 初始阶段(INCEPTION PHASE)
确定构建什么以及为什么构建
- 需求分析与验证
- 用户故事创建(适用时)
- 应用程序设计,创建并行开发的工作单元
- 风险评估与复杂度评估
🟢 构建阶段(CONSTRUCTION PHASE)
确定如何构建
- 详细组件设计
- 代码生成与实现
- 构建配置与测试策略
- 质量保证与验证
🟡 运维阶段(OPERATIONS PHASE)
部署与监控(未来)
- 部署自动化与基础设施
- 监控与可观测性设置
- 生产就绪验证
关键特性
| 特性 | 描述 |
|---|---|
| 自适应智能 | 仅执行对你的特定请求有增值的阶段 |
| 上下文感知 | 分析现有代码库和复杂度需求 |
| 基于风险 | 复杂变更得到全面处理,简单变更保持高效 |
| 问题驱动 | 在文件中提供结构化多项选择题,而非聊天 |
| 始终在掌控之中 | 审查执行计划并批准每个阶段 |
| 可扩展 | 可在核心工作流之上分层添加自定义规则,例如安全、合规、组织特定规则 |
扩展
AI-DLC 支持扩展系统,让你可以在核心工作流之上分层添加额外规则。扩展是按类别(例如 security/、testing/、resiliency/)组织在 aws-aidlc-rule-details/extensions/ 下的 markdown 文件。
扩展如何工作
每个扩展由放在同一目录中的两个文件组成:
- 一个规则文件(例如
security-baseline.md),包含扩展的规则。 - 一个选择加入文件(例如
security-baseline.opt-in.md),包含一个结构化的多项选择题,在需求分析期间呈现给用户。
在工作流启动时,AI-DLC 扫描 extensions/ 目录并仅加载 *.opt-in.md 文件。在需求分析期间,会向用户呈现每个选择加入提示。当用户选择加入时,相应的规则文件(通过命名约定推导:去掉 .opt-in.md,加上 .md)会被加载。当用户选择退出时,规则文件永远不会被加载。没有匹配 *.opt-in.md 文件的扩展会始终强制执行。
一旦启用,扩展规则就是阻塞约束——在每个阶段,模型在允许阶段继续之前会验证合规性。
内置扩展
extensions/ 目录随附以下扩展(新扩展可能会随时间添加):
aws-aidlc-rule-details/
└── extensions/
    ├── security/                      # 扩展类别
    │   └── baseline/
    │       ├── security-baseline.md          # 基础安全规则
    │       └── security-baseline.opt-in.md   # 选择加入提示
    ├── testing/                       # 扩展类别
    │   └── property-based/
    │       ├── property-based-testing.md          # 基于属性的测试规则
    │       └── property-based-testing